Pigeon fanciers often contact the clinic and describe over the phone a list of symptoms that their unwell birds are displaying. They hope that, based on these symptoms, we can make a diagnosis and yet, frustratingly, in the vast majority of cases this is simply not
possible. Usually it is a matter of logically following a process to reach an accurate diagnosis. Veterinarians have a professional responsibility to their clients to reach an accurate diagnosis as expediently and economically as possible. The veterinarian’s role is to guide the diagnostic process and then, once reached, provide advice and solutions.
The usual diagnostic pathway that is followed is:
1. History taking – an accurate description of the symptoms displayed by the bird, how long they have been present, the age and sex of the affected birds, diet, loft design, willingness to fly, dropping appearance in the loft, appetite, previous treatments and vaccination status may all be relevant.
2. Thorough clinical examination – assessing the bird’s weight, general condition, feather quality, posture, respiratory pattern, heart rate, the feel of the abdomen, and mucous membrane colour can all be assessed.
Based on the history and clinical examination the veterinarian is likely to suggest one or more diagnostic tests that are likely in the circumstances to yield the most relevant information. Tests available to the veterinarian and commonly used in pigeon practice are discussed below.
The crop flush
The technique of doing a crop flush is described in detail in the section of this book discussing microscope use. The resultant sample is examined microscopically, initially at x100 magnification and then x400 magnification. Examining the sample within ten minutes of collection is the usual way of diagnosing wet canker. The canker organisms are just visible when magnified 100 times and very clearly visible when magnified 400 times. Bacteria, yeasts, inflammatory cells, ingested food particles, pollen grains, fungal spores and other
material can all be seen. If the clinician is unsure what he is seeing, stains are available to help him to differentiate the material. Common stains used are the Gram stain and the Diff-Quik stain.
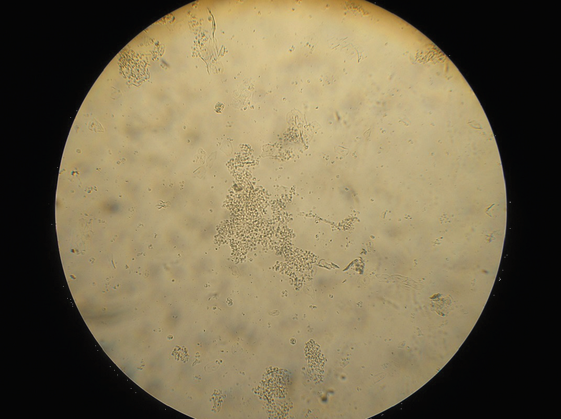
Trichomonad or canker organisms as they appear under the microscope, when magnified x100, following a crop flush. The canker organisms are the dappled grey areas in the centre and other parts of the photo. It is their size, shape and movement that enable recognition.
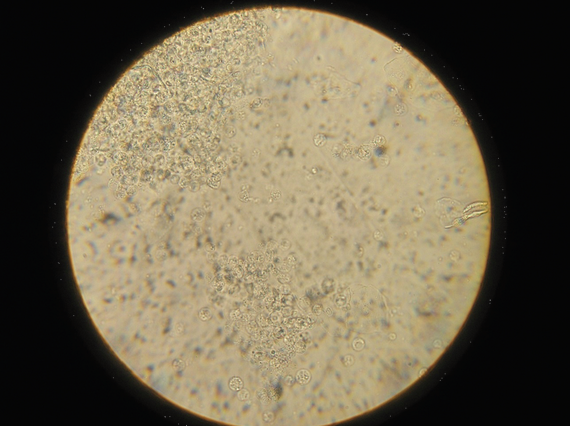
Canker organisms as they appear under the microscope, when magnified x400.
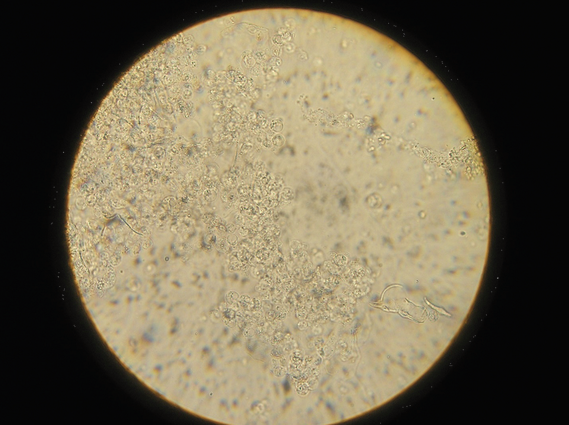
Another microscope field magnified x400, showing canker organisms. In addition to the large number of canker organisms present, several single canker organisms can be seen at the bottom of the photo
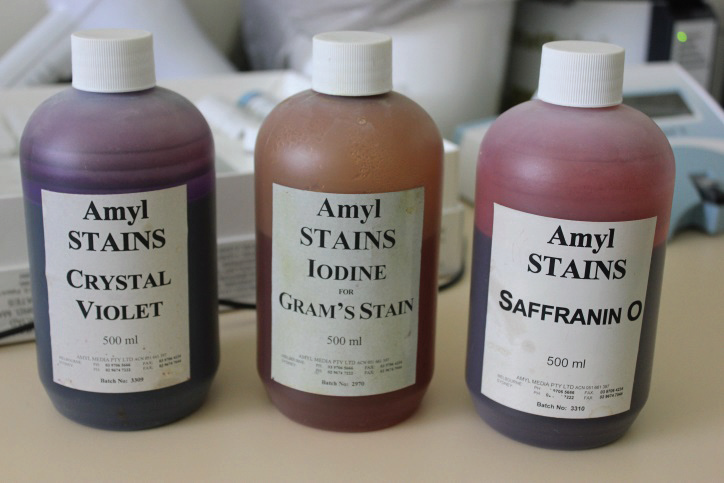
The Gram stain
In the Gram stain technique samples containing bacteria (such as a faecal smear or a crop flush) are air-dried on to a slide before being exposed to three stains (called Gram stains) in a particular order and for specific times. The technique is very commonly used to identify bacteria. Bacteria that take up the Gram stains are termed Gram positive and appear deep purple, while those that don’t, appear pink and are called Gram negative. As a general rule, but not always, Gram negative bacteria are more likely to cause disease. This is a useful way of classifying bacteria that is done in all veterinary clinics and gives an indication as to which antibiotics are likely to be affective against particular bacteria.
Gram stain technique
1. Crystal Violet 60 seconds
2 . Water rinse
3. Iodine 60 seconds
4. Water rinse
5. Rinse quickly twice with acetone alcohol, with water rinses in between
6. Saffranin 45 seconds
7. Water rinse
8. Air dry.
Diff-Quik
Diff-Quik is a brand name of a particular type of staining technique called a Romanovsky stain. In this staining technique the technician initially air dries a cellular sample such as blood, a throat, crop or conjunctival swab, or sample of inflammatory fluid on to a microscope slide. This sample is then exposed to a series of stains in a particular order and for a particular period of time, as set out below. Staining enables easier identification of material in the sample. This technique is a quick and commonly used ‘in clinic’ diagnostic technique that helps clarify what the technician is seeing down the microscope.
Diff-Quik technique
1. Air dry the smear
2 . Fix in Diff Quik fixative (or methanol) for 30 secs/drain
3. Stain with Diff Quik solution 2 for 30 secs/drain
4. Counterstain (option) with Diff Quik solution 1 for 30 secs/drain
5. Rinse in tap water to remove excess stain
6. Rapidly dehydrate in absolute alcohol
7. Clear and mount.
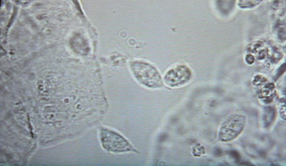
Unstained Trichomonad (canker) organisms as they appear under the microscope when magnified x4000. Easy to identify, it is their motility, as well as their size and shape, that enables quick recognition.
|
Stains used for the Gram stain technique.
|
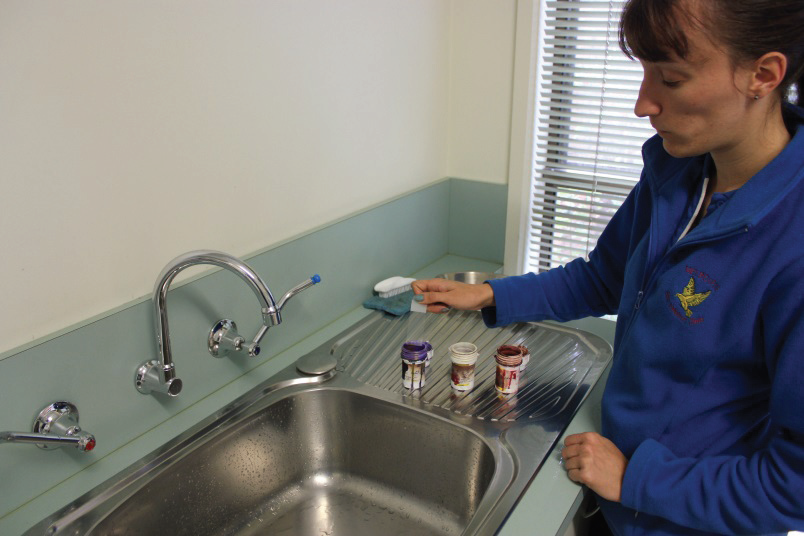
Technician doing a Gram stain.
|
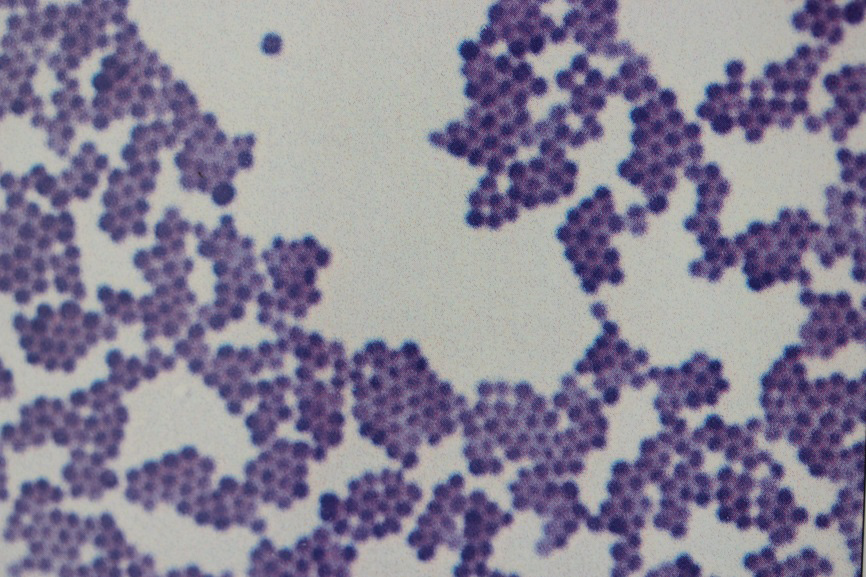
Staphylococcus as it appears after a Gram stain – a Gram positive cocci, magnified x400.
|
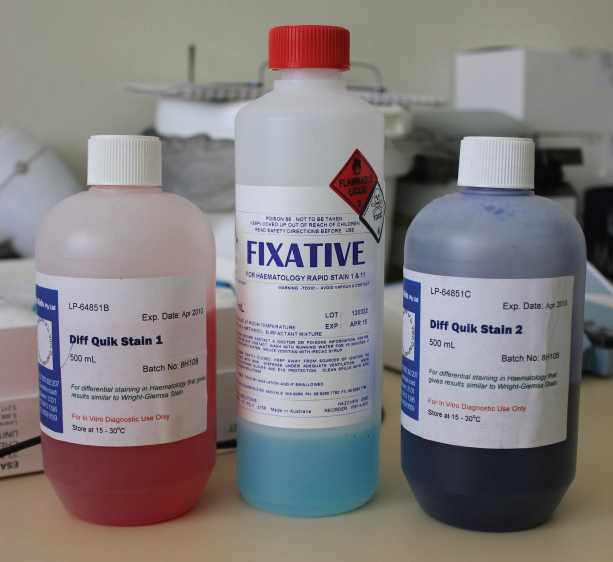
Stains used for the Diff-Quik technique.
|
Staining a sample using the Diff-Quik technique.
|
Dropping examination
The gross appearance of the droppings should be noted, as this can give much information. Droppings, for most fanciers, are the most accessible and visible indicators of their birds’ health. Tight ‘nut-like’ droppings with white urates and preferably with a down feather stuck to them usually mean good health. Green, watery droppings alert the fancier to a health problem. Green urates can indicate liver disease. Yellow urates can indicate starvation or vitamin B supplementation.
Blood in the dropping can come from the bowel, kidneys or reproductive tract and may be associated with infections or tumours in these areas or some type of poisoning, notably ingestion of rat poison or heavy metals such as lead or zinc. Some naturally occurring pigments are poorly digested by pigeons and can stain the droppings a bright colour (for example, some berries can make the dropping purple or red). The presence of whole grain can indicate a malabsorption or maldigestion disorder.
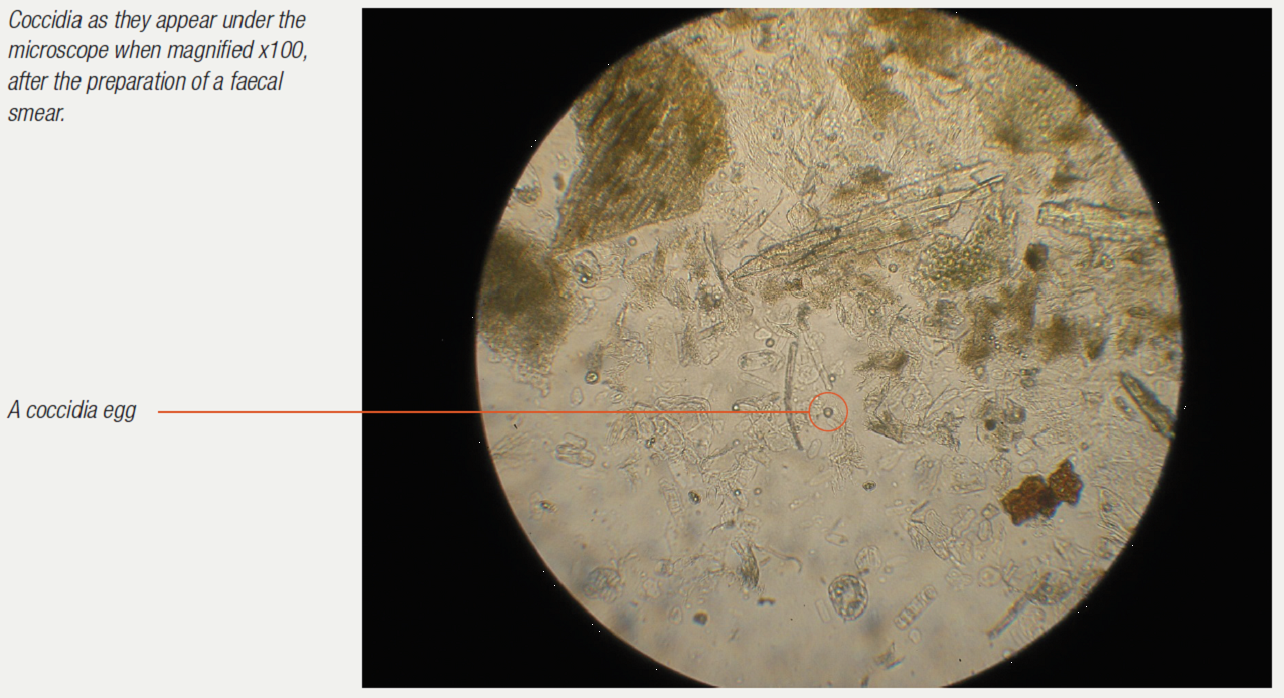
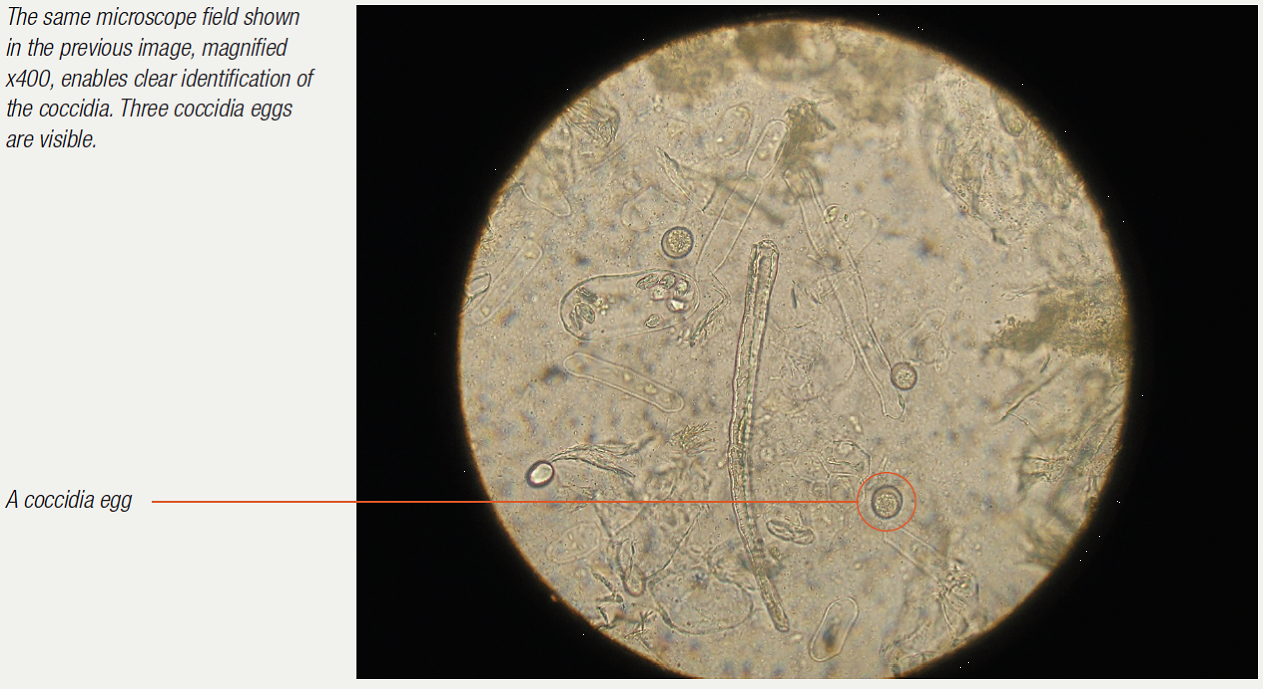
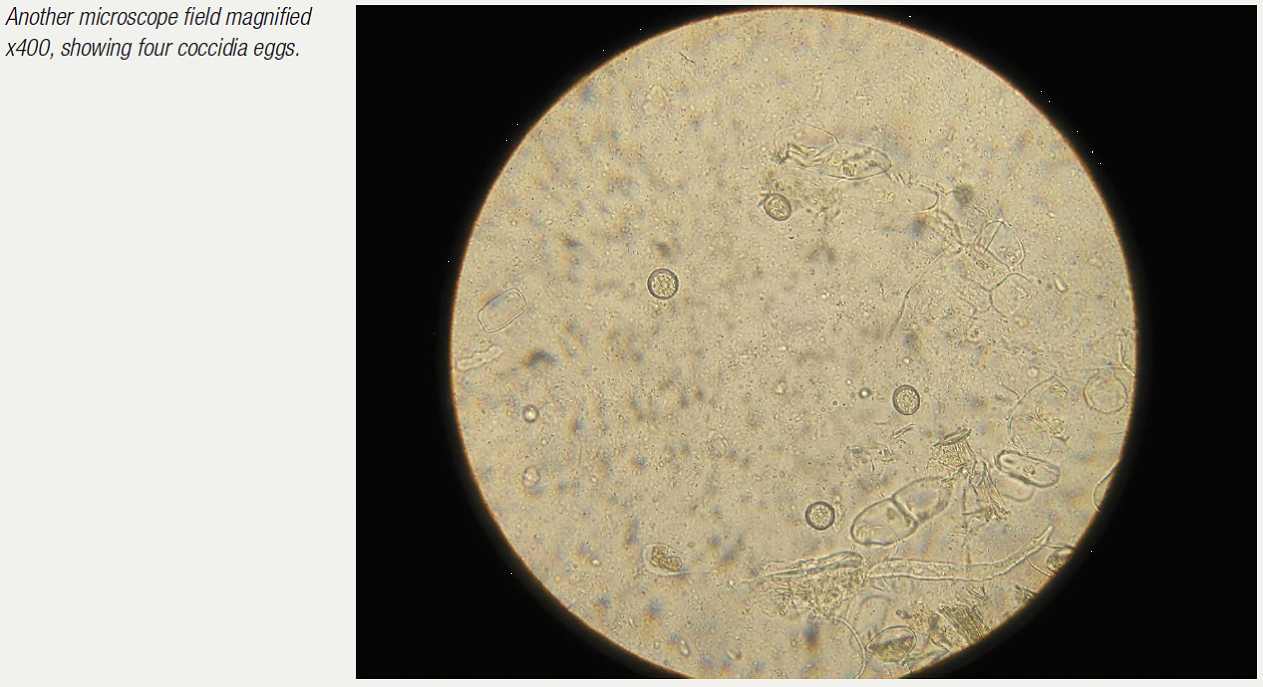
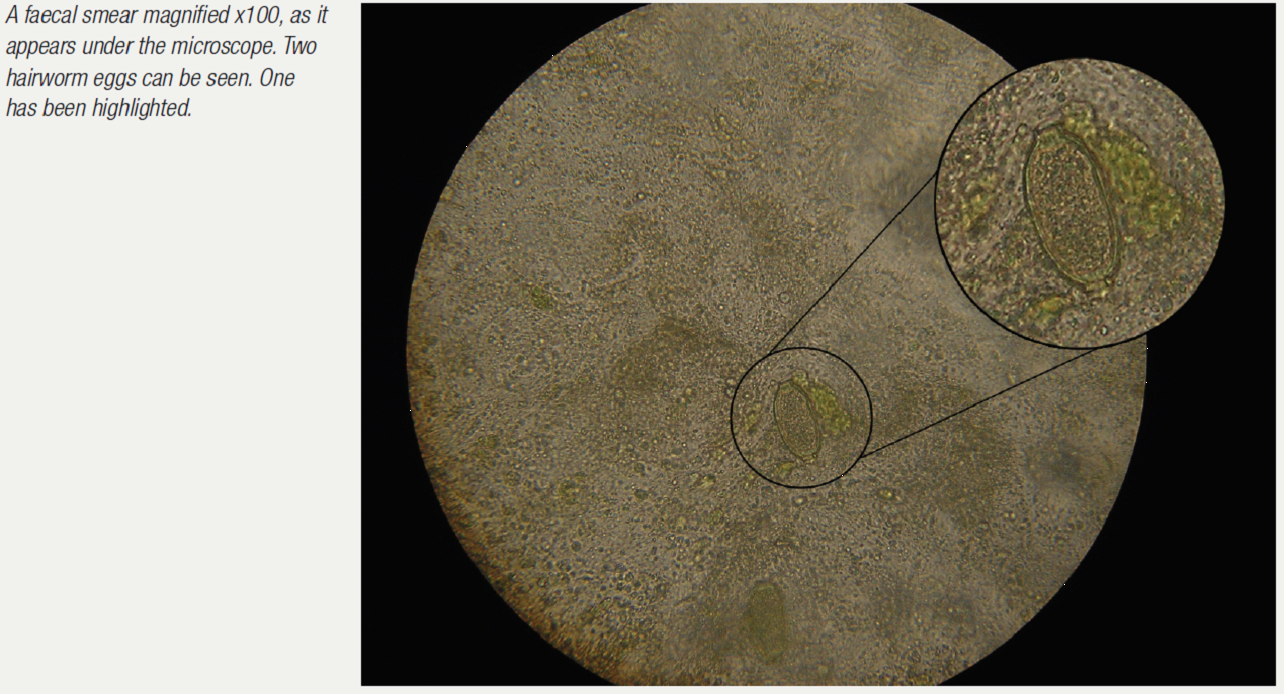
Examination of the droppings under the microscope gives much information. Usually a dropping wet smear is prepared. For this technique, see the chapter on microscope use. Worm eggs, coccidia, bacteria, yeasts, fungi, food debris, flagellates (for example, Hexamita) can all be seen if present. Various stains can also be used here to help clinicians identify what they are seeing. Gram stains help to identify and classify bacteria. Diff-Quik stains help to identify various cells. Additional stains can check for more specific problems (for example, acid-fast stains to check for Mycobacteria sp.).
The gross appearance of the droppings should be noted, as this can give much information. Droppings, for most fanciers, are the most accessible and visible indicators of their birds’ health. Tight ‘nut-like’ droppings with white urates and preferably with a down feather stuck to them usually mean good health. Green, watery droppings alert the fancier to a health problem. Green urates can indicate liver disease. Yellow urates can indicate starvation or vitamin B supplementation.
Blood in the dropping can come from the bowel, kidneys or reproductive tract and may be associated with infections or tumours in these areas or some type of poisoning, notably ingestion of rat poison or heavy metals such as lead or zinc. Some naturally occurring pigments are poorly digested by pigeons and can stain the droppings a bright colour (for example, some berries can make the dropping purple or red). The presence of whole grain can indicate a malabsorption or maldigestion disorder.
Examination of the droppings under the microscope gives much information. Usually a dropping wet smear is prepared. For this technique, see the chapter on microscope use. Worm eggs, coccidia, bacteria, yeasts, fungi, food debris, flagellates (for example, Hexamita) can all be seen if present. Various stains can also be used here to help clinicians identify what they are seeing. Gram stains help to identify and classify bacteria. Diff-Quik stains help to identify various cells. Additional stains can check for more specific problems (for example, acid-fast stains to check for Mycobacteria sp.).
|
Birds can also be placed in urine collection pens. Essentially, these are pens with sloping plastic floors. Urine runs away from the rest of the dropping. It is hard to avoid contamination, but useable samples can usually be obtained. Once available, urine is sucked into a syringe. Urine can be examined microscopically and also its specific gravity and total protein can be evaluated using a refractometer. Various colour-coded test strips (for example, Combur 9) are available to test urine for glucose, blood and other parameters.
|
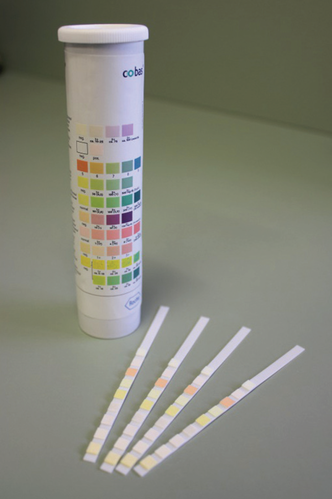
A Combur 9 urine test kit. A drop of urine is placed
on each test window and the resultant colour
change is matched against a chart.
|
Blood tests
Blood tests are very commonly done in pigeons. About 10% of a pigeon’s body weight in grams is their blood volume in ml. This means that a pigeon that weighs 450g has approximately 45mls of blood. About 10% of a pigeon’s blood volume can be removed safely at any one time. Going one step further, this means that in a 450g pigeon, 4.5ml of blood can be safely removed for diagnostic testing. Even though this amount can be drawn, usually we can run all the tests we require on only ½ ml of blood and often, just ¼ ml of blood. Taking blood therefore is a very safe procedure. Taking blood is also non-invasive and yet gives us an enormous amount of information. Incredibly, it is actually possible to take 10% of a pigeon’s circulating blood volume ten times over a 24-hour period and the pigeon will not die. This is because they can make blood very quickly and have a number of accommodation mechanisms in place to cope.
Blood tests are very commonly done in pigeons. About 10% of a pigeon’s body weight in grams is their blood volume in ml. This means that a pigeon that weighs 450g has approximately 45mls of blood. About 10% of a pigeon’s blood volume can be removed safely at any one time. Going one step further, this means that in a 450g pigeon, 4.5ml of blood can be safely removed for diagnostic testing. Even though this amount can be drawn, usually we can run all the tests we require on only ½ ml of blood and often, just ¼ ml of blood. Taking blood therefore is a very safe procedure. Taking blood is also non-invasive and yet gives us an enormous amount of information. Incredibly, it is actually possible to take 10% of a pigeon’s circulating blood volume ten times over a 24-hour period and the pigeon will not die. This is because they can make blood very quickly and have a number of accommodation mechanisms in place to cope.
Drawing blood from the right jugular vein of a racing pigeon.
The right basilic vein, located in the right ‘armpit’, a common blood collection site.
|
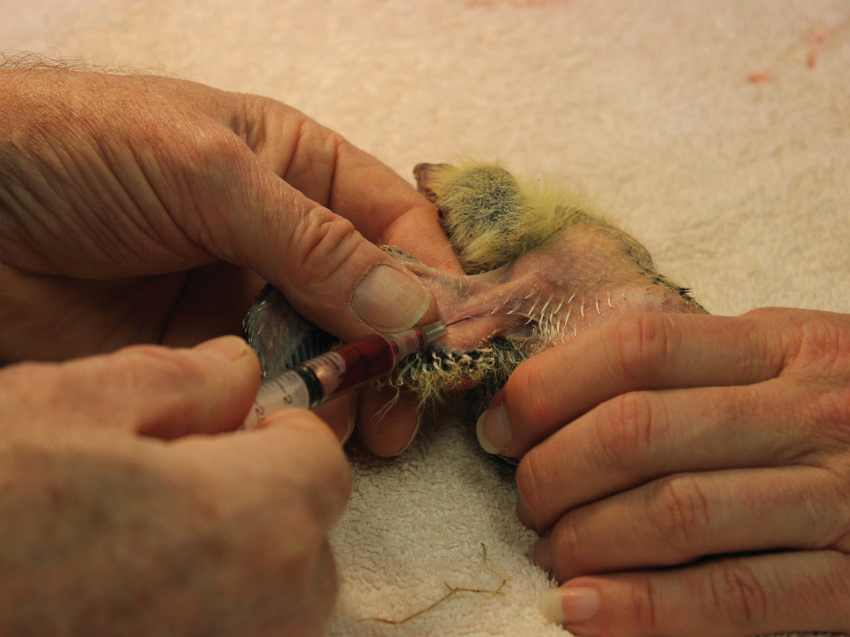
Drawing blood from the right basilic vein in a 7-day-old nestling.
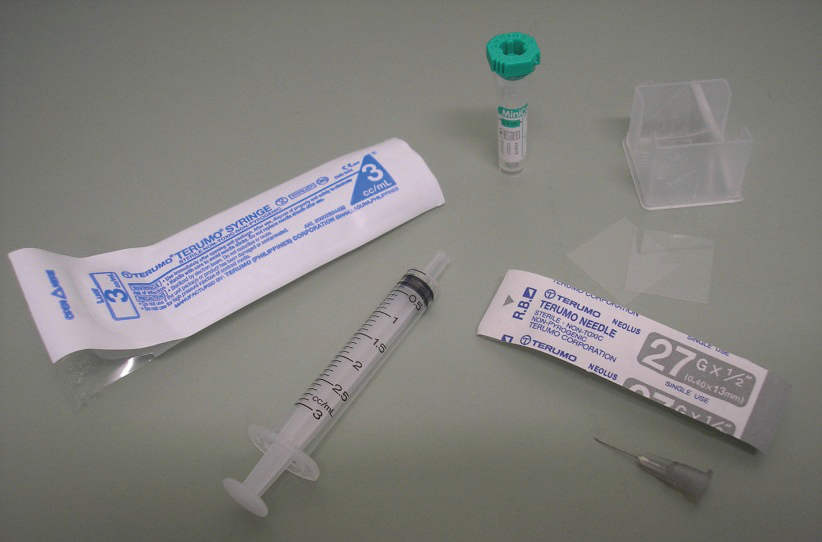
Equipment required for blood collection.
|
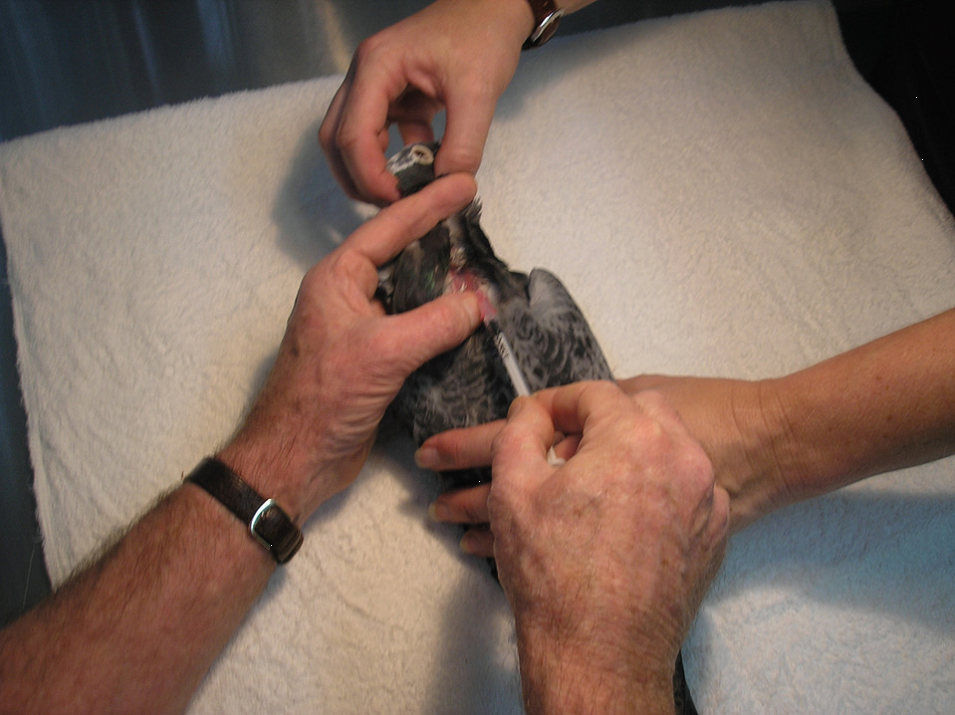
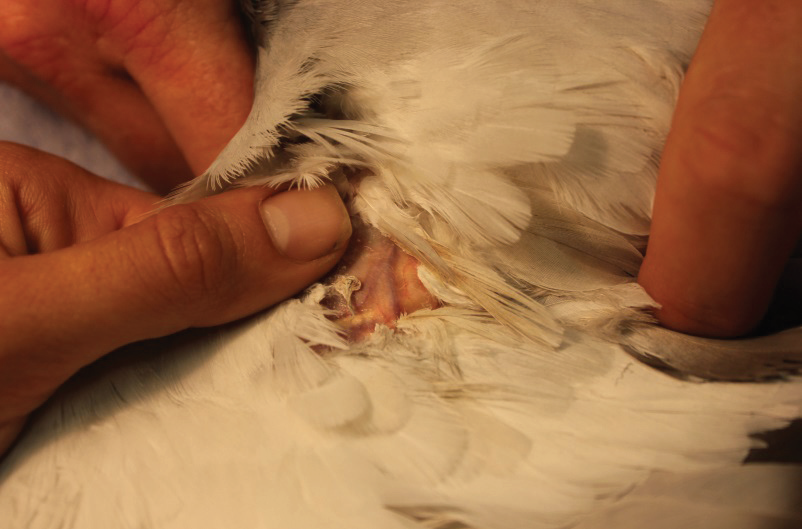
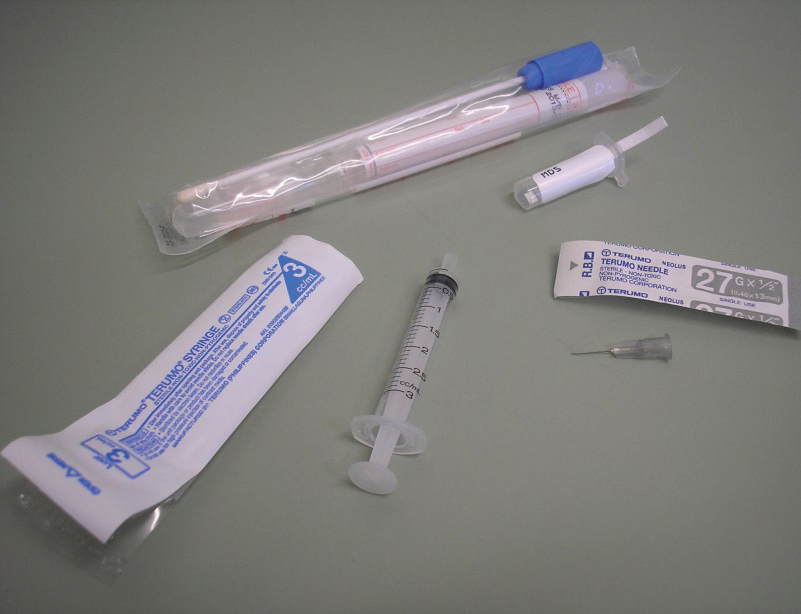
Blood can be collected from a number of sites – the right jugular vein (on the right-hand side of the neck), the right or left basilic vein (in the pigeon’s ‘armpit’) or the right or left tarsal vein (running up the inside of the leg from the foot to the ‘hock’). The usual site is the right jugular (which, in birds, is much bigger than the left jugular). The right jugular is large, being approximately 3mm across and is found in an apteric area (that is, an area without feathers) on the right side of the neck.
It is more difficult to see in pigeons than in other birds (like parrots and chickens) because of the large amount of fat both in the feather follicles and under the skin in pigeons. It sits in a groove between the neck muscles and the trachea and can usually be palpated. Typically, a 27G needle attached to a 3ml syringe is used. After wiping the skin with disinfectant, the needle is guided into the vein and a sample of blood removed. A variety of tests can then be done on the blood. The most common one is a screening biochemistry (organ function tests)/haematology (red and white blood cell parameters) profile. The preferred site by far, in competing race birds, is the right jugular vein. Even routine blood collection from the basilic vein can lead to soreness that can compromise performance.
Biochemistry/haematology profile
Once the blood is collected into the syringe, as clotting can occur quickly (which interferes with results) it is transferred immediately into a lithium heparin tube (other tubes used in mammals are not suitable for use in birds). This sample is used for the biochemistry tests. A drop of blood is typically placed on to a coverslip, with a second coverslip then being placed on top. As the two coverslips are pulled apart, two blood films are created.
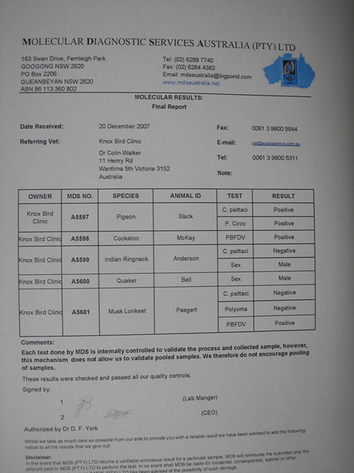
These films are used to obtain most of the haematology results. Avian blood should be kept refrigerated after collection and tested within several hours. Unlike mammal blood, avian red blood cells contain nuclei and are very metabolically active. A delay in testing means that nutrients like glucose will be used up (leading to a lower value on the test) and metabolites such as urea will be created (leading to a higher value) meaning that some test results will become erroneous and the diagnostic process confused. In Melbourne, where our clinic is located, our lab collects samples at noon and at 7pm. Results are available to us usually within five hours of blood collection. Blood results are usually reported to veterinarians in table form as shown on page 42.
Blood can also be used along with other samples to test for various specific diseases including Salmonella, Chlamydia, Circo virus, Adeno virus, Paramyxovirus and others.
It is more difficult to see in pigeons than in other birds (like parrots and chickens) because of the large amount of fat both in the feather follicles and under the skin in pigeons. It sits in a groove between the neck muscles and the trachea and can usually be palpated. Typically, a 27G needle attached to a 3ml syringe is used. After wiping the skin with disinfectant, the needle is guided into the vein and a sample of blood removed. A variety of tests can then be done on the blood. The most common one is a screening biochemistry (organ function tests)/haematology (red and white blood cell parameters) profile. The preferred site by far, in competing race birds, is the right jugular vein. Even routine blood collection from the basilic vein can lead to soreness that can compromise performance.
Biochemistry/haematology profile
Once the blood is collected into the syringe, as clotting can occur quickly (which interferes with results) it is transferred immediately into a lithium heparin tube (other tubes used in mammals are not suitable for use in birds). This sample is used for the biochemistry tests. A drop of blood is typically placed on to a coverslip, with a second coverslip then being placed on top. As the two coverslips are pulled apart, two blood films are created.
These films are used to obtain most of the haematology results. Avian blood should be kept refrigerated after collection and tested within several hours. Unlike mammal blood, avian red blood cells contain nuclei and are very metabolically active. A delay in testing means that nutrients like glucose will be used up (leading to a lower value on the test) and metabolites such as urea will be created (leading to a higher value) meaning that some test results will become erroneous and the diagnostic process confused. In Melbourne, where our clinic is located, our lab collects samples at noon and at 7pm. Results are available to us usually within five hours of blood collection. Blood results are usually reported to veterinarians in table form as shown on page 42.
Blood can also be used along with other samples to test for various specific diseases including Salmonella, Chlamydia, Circo virus, Adeno virus, Paramyxovirus and others.
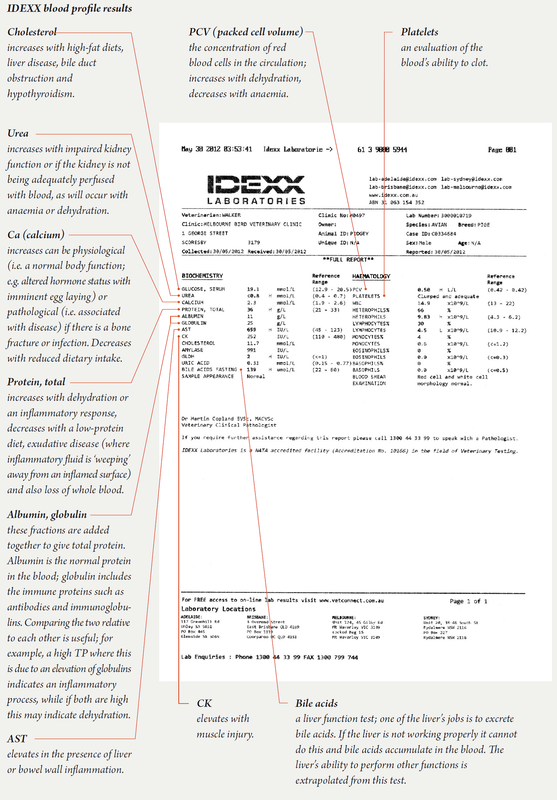
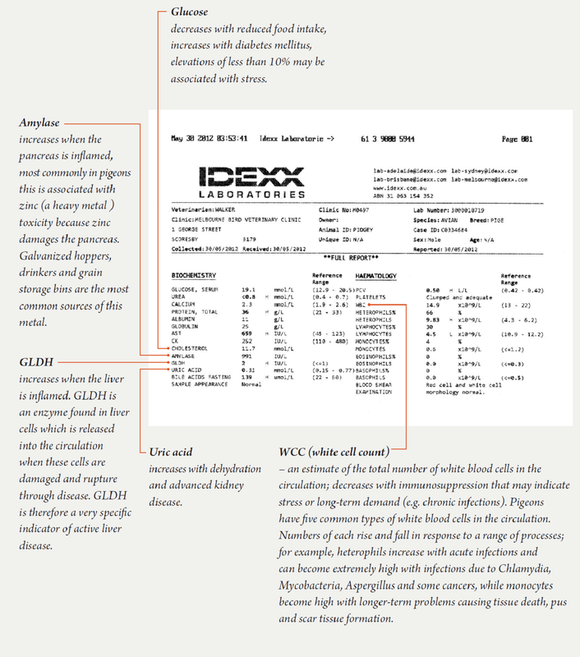
Most veterinary clinicians review several blood profiles every day. A blood profile enables an experienced clinician to evaluate the nature of a particular health problem and estimate its severity. Through experience clinicians become very familiar with these figures and can interpret their meaning quickly.
Please note that these notes are designed to give an indication of how a blood profile can be used to evaluate disease. The points discussed are all commonly encountered in practice, but the explanations and the interpretation of changes is by no means exhaustive. Indeed, whole books have been written about blood profile interpretation.
As you can see this gives the clinician and fancier an enormous amount of information about the birds’ health. A blood profile is commonly done to investigate the cause of an individual valuable bird’s poor health and sometimes also on a bird from a race team to identify any problems in the team generally.
Diagnosis of Chlamydia
The accurate diagnosis of Chlamydia by some technicians has been described as an art form. A number of tests are available; all have their advantages and disadvantages. Some tests are better in certain circumstances while in other situations an alternative test gives better information. The available tests either detect the Chlamydia organism itself or evidence of its presence. Some of the information below will be of more use to the veterinarian, but will also help the pigeon fancier to understand what samples are likely to be requested.
Available tests include:
1. Identifying the organism in tissues collected from live birds or autopsy samples. Tissues are stained with Gimenez or Macchiavellos stain which enables the Chlamydia to be seen in macrophages ( a type of white blood cell ) in the tissues
2. Culture of the organism – cloacal and choanal swabs can be collected, packed in ice (but not frozen) and sent to a lab. Special transport media are available.
3. Test for antibodies (immune substances formed in the blood after exposure to Chlamydia)
a. EBA Elementary-Body Agglutination detects IgM (an antibody formed in response to exposure to Chlamydia); this test takes 7 – 12 days to become positive after infection, post-treatment levels halve on average every 3 – 4 months
b. Complement fixation e.g. Chlamydia Immunocomb test which detects IgG (an antibody formed in response to exposure to Chlamydia); this test takes up to 3 weeks to be positive after exposure, levels drop significantly two years after treatment (see below)
In both tests, rising titres (four fold) over two weeks indicate active infection.
4. Test for antigen (substance associated with the Chlamydia organism itself)
a. ELISA Enzyme Linked Immunosorbent Assay e.g. Chlamydia ‘Clearview’ antigen, this test has fallen out of favour, false positives occur through cross-reactions with other organisms, false negatives occur due to intermittent shedding of Chlamydia
b. PCRs: detects Chlamydial DNA in samples (see below)
c. IFA Immunofluorescent Antibody: detects Chlamydial antigen in tissues
d. AvianLabs QUICK test: sandwich lateral flow immunochromatographic assay test (see below)
5. Indirect diagnosis
a. The white blood cell count, liver enzymes and other changes that occur as a result of Chlamydial infection can be monitored
b. Response to treatment: as the drugs that treat Chlamydia also treat some other infections, this is only supportive of a diagnosis
Of these, the Chlamydia Immunocomb, PCR and AvianLabs QUICK tests are the most commonly used to diagnose the condition in live birds in Australia.
Chlamydia immunocomb test
This test detects the presence of IgG (immunoglobulin type G) formed in the blood in response to exposure to Chlamydia. When pigeons become infected with Chlamydia they form IgG in the blood and this can be detected. The presence of this in the blood therefore correlates quite well with active disease. This test takes about 4 hours to do in most veterinary clinics and is comparatively economical.
Difficulties with this test can be that birds in the very early stages of infection may not have been infected long enough to have produced detectable levels of IgG (this is thought to take over a week). Also, in chronic cases, the IgG level tends to stabilise at low levels, again making detection sometimes difficult. Some birds that have recovered and no longer have active disease continue to maintain IgG in the blood for up to 6 months. Despite these limitations, a high level of IgG in the presence of symptoms consistent with Chlamydia is very supportive of a diagnosis.
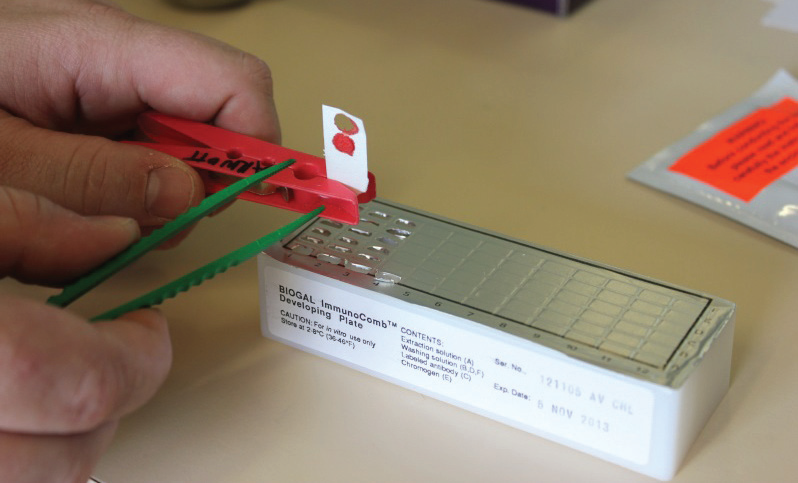
Blood is collected on to a test paper.
|
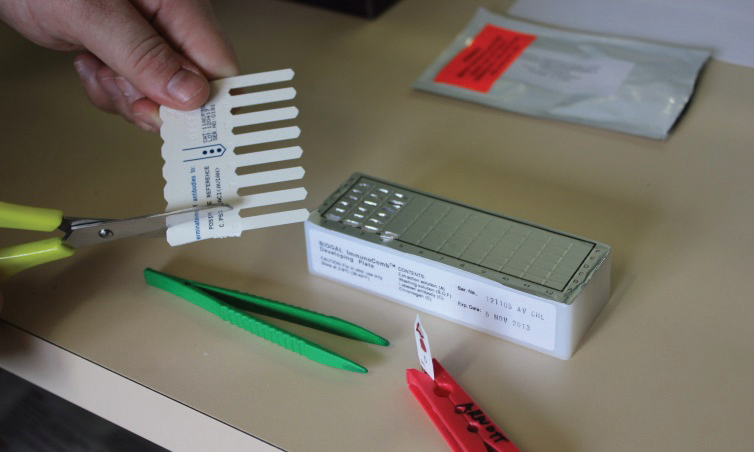
Chlamydia antibody is extracted in a test cell.
|

A test comb is moved through a series of testing cells.
|
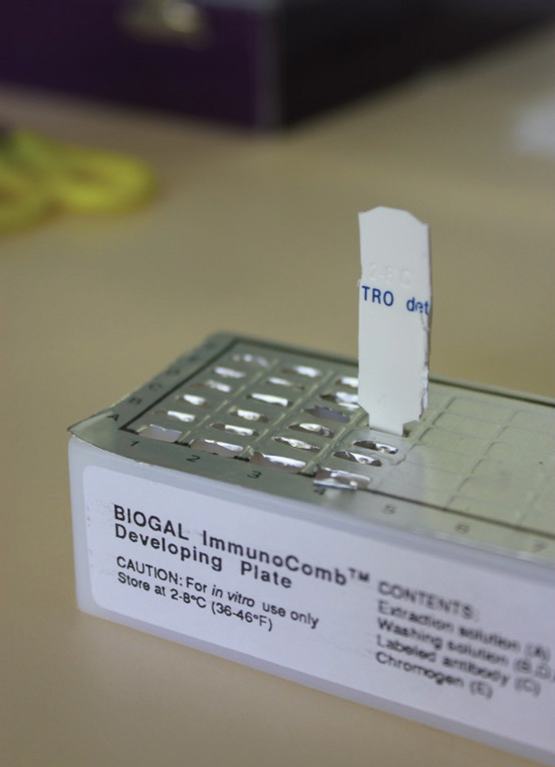
The test continues for about 4 hours.
|
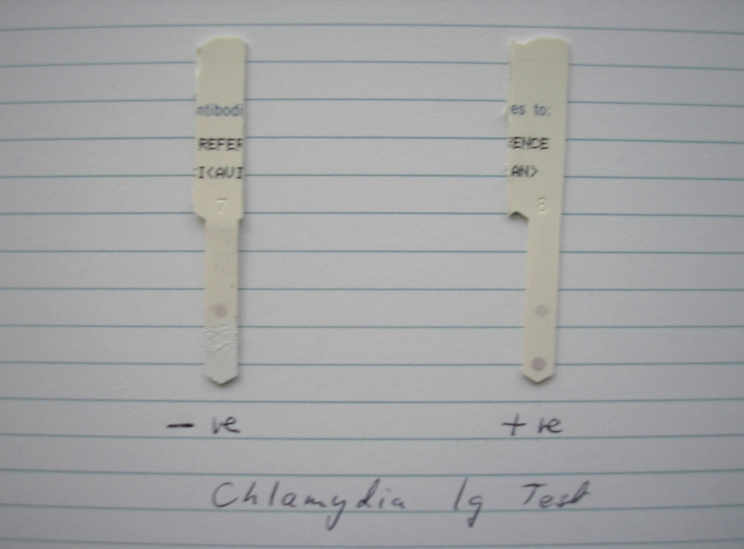
Two Chlamydia Immunocomb test results; negative on the left, positive on the right (a dark spot is visible at the base of the test paper, indicating the presence of Chlamydia IgG).
|
— PCR tests
In this clever piece of technology, a Polymerase Chain Reaction (PCR) is used to multiply minute amounts of DNA in a sample. Once at a particular level, this DNA can be matched with various primers for infectious disease agents. PCR tests are available to test for the presence of the DNA of Chlamydia, Circo virus, PMV, Herpes virus, Mycobacteria, Mycoplasma and others. Samples are collected from any site where it is thought the organism in question might be found. These include tears, saliva, blood, droppings or tissues found at autopsy.
In a live pigeon, usually a test paper is wiped in the throat, ‘slot’ in the roof of the mouth and inside the eyelids, for Chlamydia. This can be combined with a drop of blood and submitted for testing. In a dead bird, samples are usually collected from organs which are targeted by the particular infection in question. For Chlamydia these include the liver, lungs, spleen and kidneys. A test paper is used to wipe cells from these organs and is then submitted for testing. Although it sounds technically complex, PCR tests are extremely commonly done in practice. In most areas it takes about five days to get results back from the lab. PCRs are cheap, very accurate, and have the big advantage (as the DNA is very stable) that they can be done on birds that have been dead for several days (such as those that may have been posted to a clinic for autopsy).
Equipment required for a PCR test.
|
PCR results as they are reported to the veterinarian.
|
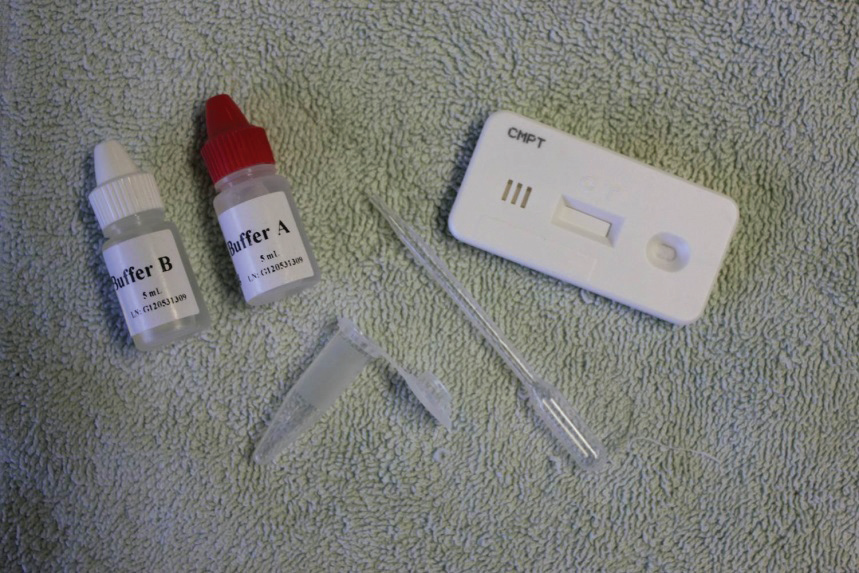
— AvianLabs QUICK test
A simple test with a long name, this is a sandwich lateral flow immunochromatographic assay test. This test checks for antigen (that is, part of the disease-causing organism). Similar samples to that collected for a PCR are collected. Extraction fluids are added to the sample in a test vial. The resultant supernatant is dropped on to a test paper. If antigens are present this reacts with antibodies in the test paper and a coloured line appears. A second control line also appears as a check to ensure that the test has been done correctly. A QUICK test takes only about ten minutes to do, is very accurate and rapidly gaining in popularity. QUICK tests are available to test for Chlamydia, Salmonella, PMV and Adeno virus. Because the test result is quickly available, this enables prompt and accurate treatment. The test is relatively economical, making it also possible to test a team regularly through the season.
A simple test with a long name, this is a sandwich lateral flow immunochromatographic assay test. This test checks for antigen (that is, part of the disease-causing organism). Similar samples to that collected for a PCR are collected. Extraction fluids are added to the sample in a test vial. The resultant supernatant is dropped on to a test paper. If antigens are present this reacts with antibodies in the test paper and a coloured line appears. A second control line also appears as a check to ensure that the test has been done correctly. A QUICK test takes only about ten minutes to do, is very accurate and rapidly gaining in popularity. QUICK tests are available to test for Chlamydia, Salmonella, PMV and Adeno virus. Because the test result is quickly available, this enables prompt and accurate treatment. The test is relatively economical, making it also possible to test a team regularly through the season.
Diagnostics and the common diseases
2•5
Equipment required for an AvianLab Chlamydia QUICK test.
|
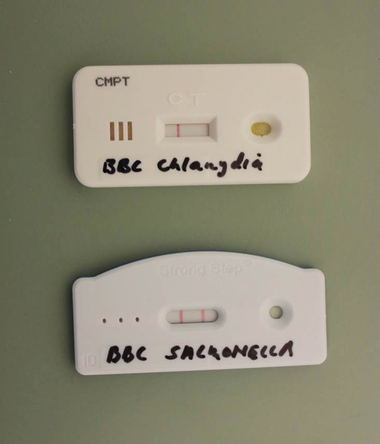
QUICK test results. The top test is negative for
Chlamydia, the lower test is positive for Salmonella.
|
DNA parentage testing
Advances in DNA technology now allow for parentage testing of pigeons. Samples containing DNA (such as blood or freshly plucked feathers) are collected and submitted to a DNA lab from one or both parents and youngsters. In the test various genetic markers are identified on sections of the pigeon genome and then compared between samples. Related birds share a higher proportion of these markers. Labs quote an accuracy of 99.50% if both parents are examined and 99.00% if one parent is checked. Usually ten markers are used; however, if there is uncertainty 20 markers can be examined.
Currently, gender and endurance genes can also be checked and it is likely that this will be expanded in the future to include further characteristics. Parentage testing is useful whenever the parentage of a bird is uncertain, but is particularly gaining popularity amongst studs wishing to guarantee that youngster offered for sale are indeed off champion birds. It gives purchasing fanciers increased confidence. Interested fanciers should visit www.PiGen.be.
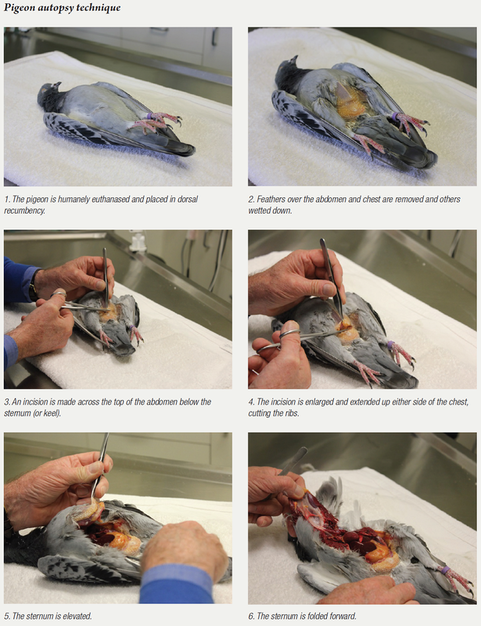
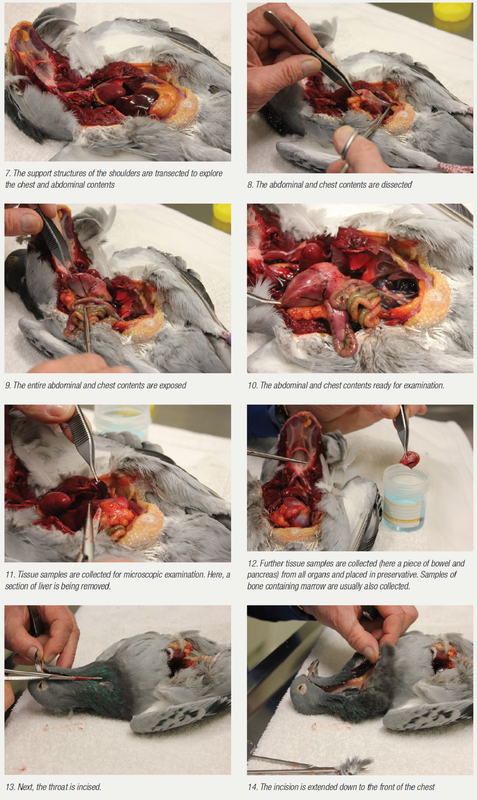
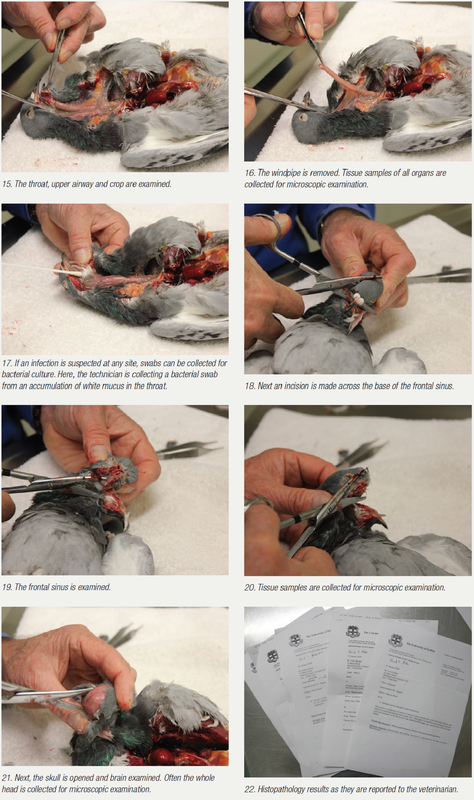
Autopsy
It is always a matter of correlating the degree of diagnostic effort with the severity of the problem. In a severe problem, where multiple pigeons are sick or have died or there is an ongoing loss of form in a race team and other tests are not allowing a complete diagnosis to be made, sometimes your veterinarian may suggest an autopsy. Here, a bird that is showing symptoms that are representative of the problem is selected and humanely euthanased. During the autopsy, changes may be visible that allow a tentative diagnosis to be made. More often than not, however, the changes are all there, but at a microscopic level.
Often, the aim of the autopsy is to collect tissue samples for microscopic examination. All relevant tissue samples are collected within four hours of death, fixed in preservative and forwarded to an avian pathologist for microscopic examination. It is important that the tissue is collected within four hours of death, as tissue breakdown and invasion by the bacteria involved in decomposition occurs after this time. It is also important that sections of many organs are submitted, including the brain, bone marrow, air sacs, skin, bursa, multiple bowel sections and not just the more standard liver, spleen, kidney, lungs, etc. Organs not examined create an opportunity for pathology to be overlooked. The one organ that is not submitted may be the one that would have given the diagnosis.
I remember some years ago, an autopsy on a bird suspected of having a particular viral infection. The virus was known to infect a whole list of organs and, less commonly, the skin. I included all of the suspect organs and at the end of the autopsy, as much as anything as an afterthought, the skin. The virus was only identified in one place – the skin. Had I not included this sample, the diagnosis would not have been reached. It is also very important that the tissue samples are sent to an avian pathologist.
Government labs are often geared to diagnose chicken diseases of commercial importance, and may only see two or three other birds per month. It is unreasonable to expect these pathologists to recognise subtle abnormalities in pigeon samples. Samples need to be submitted by your veterinarian to a pathologist that does a lot of avian work. The amount of information presented to an avian vet from a full pathology report is enormous. This test is regarded by many as the definitive test. Problems as diverse as infections, fungal toxin exposure, tumours and nutritional information can all be assessed.
Autopsy and histopathology results in many areas take five to ten days to be available and, compared to other tests, can be quite costly; however, in the presence of a more severe or ongoing problem, they are often the best way to accurately solve the problem.
Advances in DNA technology now allow for parentage testing of pigeons. Samples containing DNA (such as blood or freshly plucked feathers) are collected and submitted to a DNA lab from one or both parents and youngsters. In the test various genetic markers are identified on sections of the pigeon genome and then compared between samples. Related birds share a higher proportion of these markers. Labs quote an accuracy of 99.50% if both parents are examined and 99.00% if one parent is checked. Usually ten markers are used; however, if there is uncertainty 20 markers can be examined.
Currently, gender and endurance genes can also be checked and it is likely that this will be expanded in the future to include further characteristics. Parentage testing is useful whenever the parentage of a bird is uncertain, but is particularly gaining popularity amongst studs wishing to guarantee that youngster offered for sale are indeed off champion birds. It gives purchasing fanciers increased confidence. Interested fanciers should visit www.PiGen.be.
Autopsy
It is always a matter of correlating the degree of diagnostic effort with the severity of the problem. In a severe problem, where multiple pigeons are sick or have died or there is an ongoing loss of form in a race team and other tests are not allowing a complete diagnosis to be made, sometimes your veterinarian may suggest an autopsy. Here, a bird that is showing symptoms that are representative of the problem is selected and humanely euthanased. During the autopsy, changes may be visible that allow a tentative diagnosis to be made. More often than not, however, the changes are all there, but at a microscopic level.
Often, the aim of the autopsy is to collect tissue samples for microscopic examination. All relevant tissue samples are collected within four hours of death, fixed in preservative and forwarded to an avian pathologist for microscopic examination. It is important that the tissue is collected within four hours of death, as tissue breakdown and invasion by the bacteria involved in decomposition occurs after this time. It is also important that sections of many organs are submitted, including the brain, bone marrow, air sacs, skin, bursa, multiple bowel sections and not just the more standard liver, spleen, kidney, lungs, etc. Organs not examined create an opportunity for pathology to be overlooked. The one organ that is not submitted may be the one that would have given the diagnosis.
I remember some years ago, an autopsy on a bird suspected of having a particular viral infection. The virus was known to infect a whole list of organs and, less commonly, the skin. I included all of the suspect organs and at the end of the autopsy, as much as anything as an afterthought, the skin. The virus was only identified in one place – the skin. Had I not included this sample, the diagnosis would not have been reached. It is also very important that the tissue samples are sent to an avian pathologist.
Government labs are often geared to diagnose chicken diseases of commercial importance, and may only see two or three other birds per month. It is unreasonable to expect these pathologists to recognise subtle abnormalities in pigeon samples. Samples need to be submitted by your veterinarian to a pathologist that does a lot of avian work. The amount of information presented to an avian vet from a full pathology report is enormous. This test is regarded by many as the definitive test. Problems as diverse as infections, fungal toxin exposure, tumours and nutritional information can all be assessed.
Autopsy and histopathology results in many areas take five to ten days to be available and, compared to other tests, can be quite costly; however, in the presence of a more severe or ongoing problem, they are often the best way to accurately solve the problem.
Endoscopy
An endoscope is a medical instrument about the size of a drinking straw, full of fibre optic cables that can be inserted through a variety of recognised access points to view internal structures in the live, anaesthetised pigeon. Most avian endoscopes are very narrow, only about 2 to 3mm wide and about 20cm long. This may sound invasive but usually the incision to insert the endoscope is only as big as the endoscope itself. Sometimes a single stitch is placed after the endoscope is removed, but often this is not necessary.
Pigeons recover from the procedure usually in less than five minutes and the small cut heals in less than seven days. The images obtained through looking through an endoscope are very clear, because most of a pigeon’s body is full of air-filled spaces – the air sacs. Surgical manuals list in detail the various points to make a small incision to allow entry of the endoscope in order to look at particular internal organs. Usually the pigeon is given a light gas anaesthetic, a few feathers are plucked and the skin cleaned with disinfectant. The incision is then made, the endoscope inserted and internal structures examined. The entire procedure is usually over in minutes and the birds are usually back on their feet in under ten minutes.
The most common application in pigeons for endoscopy is to examine the gonads of reduced-fertility birds. For example, a cock not filling his eggs may have an infection, cyst or tumour of the testis that can be almost instantly recognised by visual examination. If necessary, an endoscopically-guided swab for bacterial culture or tissue samples can be collected. Other applications can include looking down the windpipe or into an air sac in a bird having trouble breathing, and also examining a mass visible on x-ray.
Endoscopic examination, because it requires an anaesthetic and the use of an expensive instrument (the endoscope) can be quite expensive. Although there is a risk with the anaesthetic it is minimal, but the birds do need to have several quiet days afterwards. However, in an appropriate situation, the benefit of the information gained makes this a worthwhile procedure.
Endoscopic examination of the reproductive organs is common in avian practice particularly to investigate infertility. Endoscopy enables visual examination of the gonads and other structures.
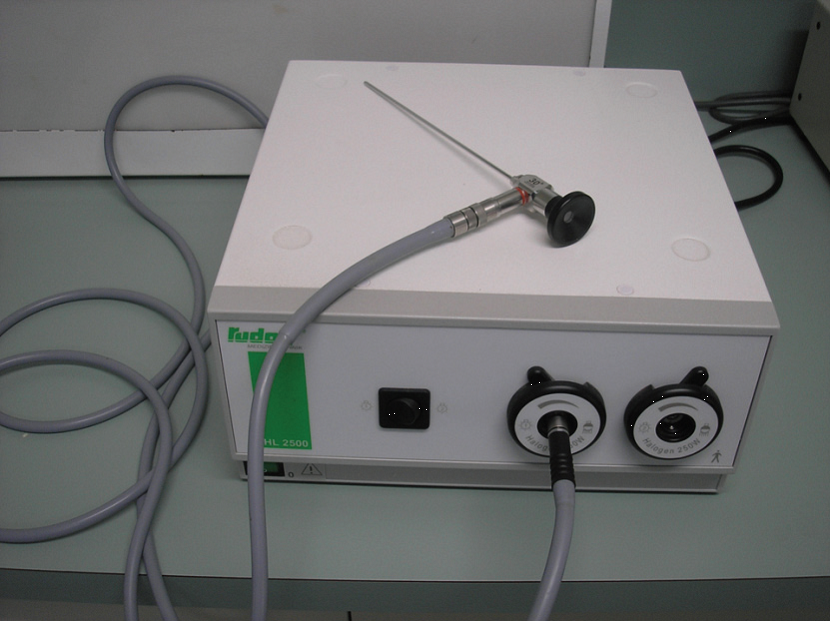
An endoscope
|
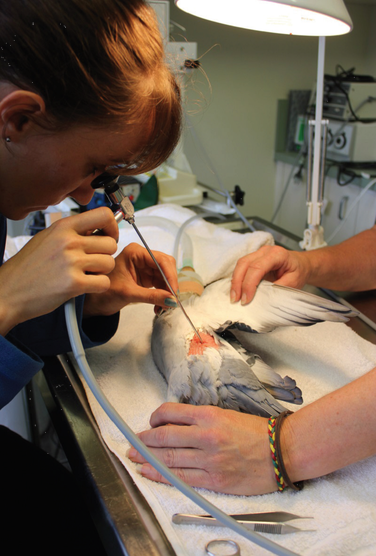
A technician using an endoscope to examine the gonad of an anaesthetised racing pigeon.
|
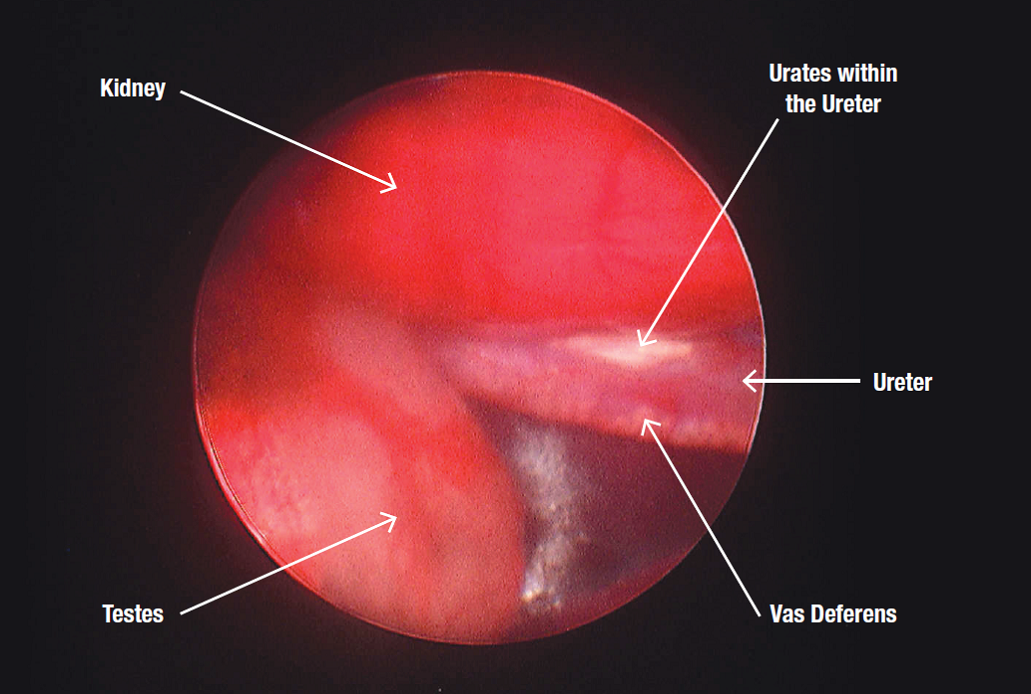
An endoscopic image of the gonads of a cock.Here the back of the left testes can be seen below the anterior division of the left kidney. The vas deferens carries sperm from the testes to the cloaca.In this image, urates(the white part of the dropping)can be seen within the ureter( the tube that carries urine from the kidney to the cloaca) on the way to be excreted with the rest of the dropping.
|
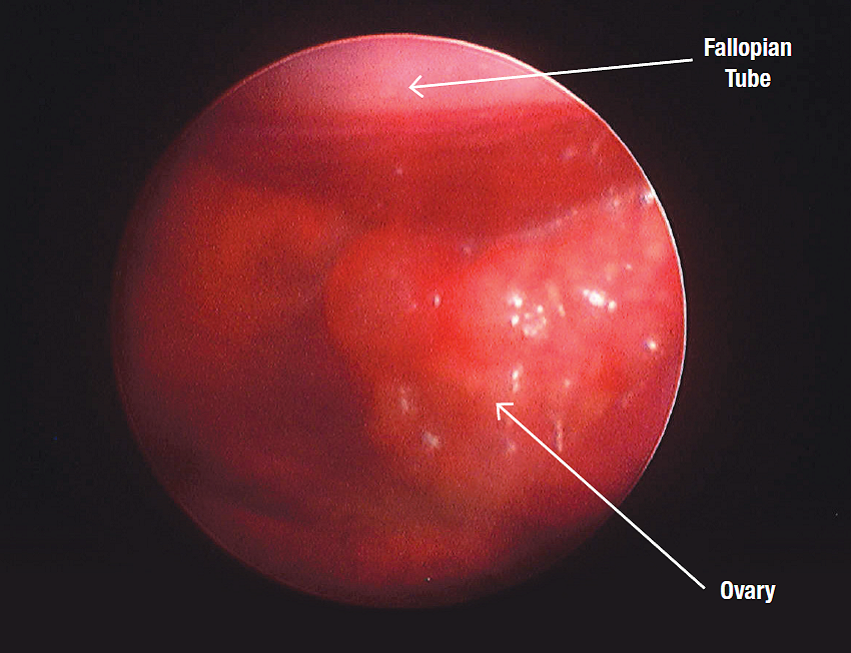
An endoscopic image of the gonads of a hen. Multiple follicles are visible on the ovary. An egg is released when a follicle ruptures. This egg is then carried to the oviduct in the fallopian tube.
Endoscopy photos taken by Dr Colin Walker at Southpaws Specialist Referral Centre. Photographic equipment made available courtesy of Dr Charles Kuntz
|
X-ray
Everyone is familiar with radiographs. Today’s digital x-ray machines have all the features of a digital camera – zoom, focus, magnification, etc., and enable very clear and diagnostic x-ray films to be produced. If indicated, contrast agents such as barium (which shows up as a brilliant white on x-ray) can be used to highlight suspect areas. Digital x-ray machines cost tens of thousands of dollars and so providing this as a diagnostic modality by your vet is an expensive service. In valuable individual birds with internal disease or injury their use, however, is common.
Everyone is familiar with radiographs. Today’s digital x-ray machines have all the features of a digital camera – zoom, focus, magnification, etc., and enable very clear and diagnostic x-ray films to be produced. If indicated, contrast agents such as barium (which shows up as a brilliant white on x-ray) can be used to highlight suspect areas. Digital x-ray machines cost tens of thousands of dollars and so providing this as a diagnostic modality by your vet is an expensive service. In valuable individual birds with internal disease or injury their use, however, is common.
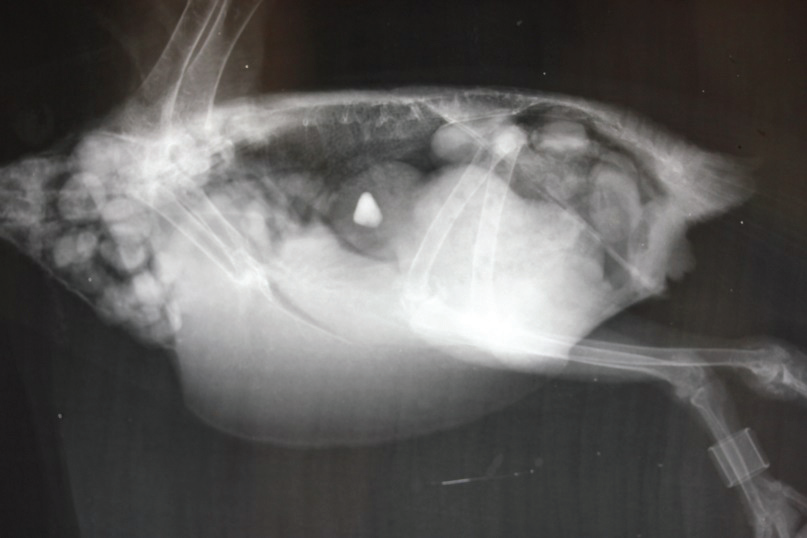
A 10-year-old racing pigeon was presented with weight loss and vomiting. An x-ray of the bird lying on its side showed a distended proventriculus (glandular stomach).
|
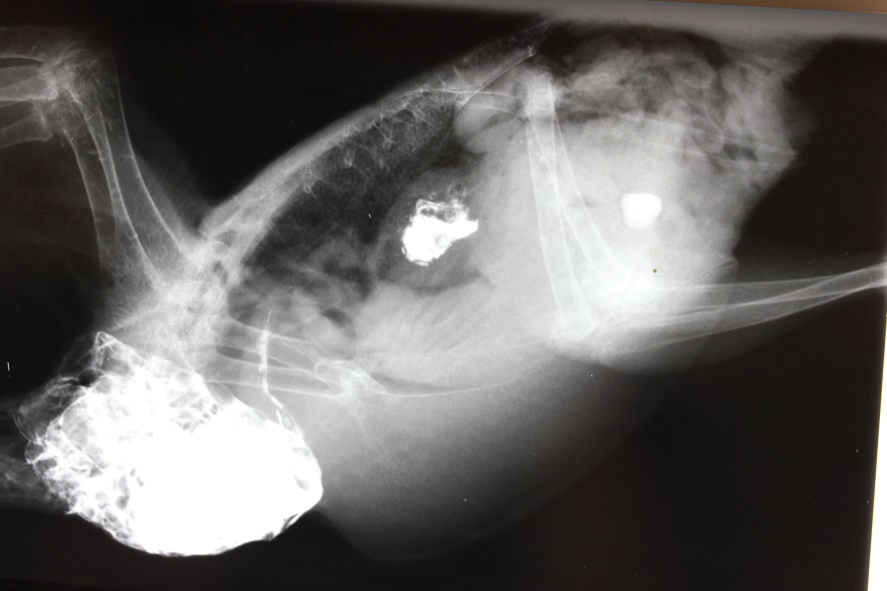
Barium (which shows up as bright white on x-ray) was given. An x-ray taken 1 hour later showed delayed crop emptying (the large amount of white material still in the crop) and barium accumulating in the proventriculus.
|
|
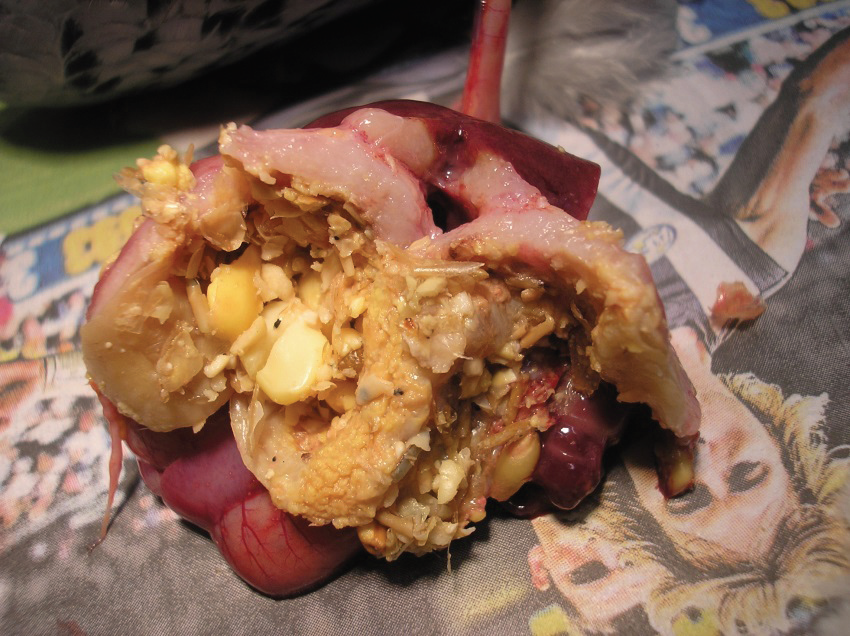
Further tests following radiography confirmed the presence of proventricular cancer. The bird was euthanased. Autopsy revealed the presence of a malignant tumour, called an adenocarcinoma, in the wall of the proventriculus. In the above photo the glandular stomach has been opened; the pale pink tissue in the dorsal wall is the cancer.
|
Other imaging tests
Occasionally in avian practice, MRIs and CT scans are done. They do have their applications but, because of the costs involved, their use is limited. The most common application has been to look at the brain of a living bird.
Bacterial testing
Three common bacterial tests are done:
1. Microscopic examination
2. Culture or growth of the bacteria.
These two steps allow the bacteria to be identified and named.
3. Sensitivity. The bacteria are tested against a number of antibiotics to see which ones they are sensitive to; i.e., which ones are likely to control an infection caused by those bacteria.
Many bacteria are found throughout a pigeon’s body. Some are harmless, some are actually beneficial and some have the potential to cause disease. When disease occurs due to bacteria, identifying the bacteria involved has many advantages. Once identified and named, we then know the whole biology of those bacteria, including what antibiotics are most likely to be effective, the likely source, and how to prevent a recurrence. For example, we know that Pseudomonas bacteria are frequently associated with a contaminated water source, while Camphylobacter often come from the droppings of wild birds.
Accurately identifying the bacteria means that steps can be taken to avoid repeat exposure so that the problem is less likely to come back after an antibiotic treatment. Failure to do this means that the problem becomes ongoing and repeat antibiotic courses can be necessary. Once cultured (or grown) the bacteria can also be tested against a number of antibiotics to see which ones they are most sensitive to. This takes away the guess work and means that a shorter antibiotic course is likely to be effective.
Swabs for bacterial testing can be collected from any site of infection. Common sites include the throat, sinus, crop and droppings. Once collected, the bacteria on these swabs are initially identified through their morphology (appearance) under the microscope and various staining techniques such as the Gram stain mentioned earlier. Swabs are usually forwarded to a diagnostic lab where the bacteria present are grown. Their growth characteristics further help with identification. Once identified, the bacteria are tested against a number of antibiotics to see which one is most likely to be effective in treatment.

Collecting a swab for bacterial culture from the ‘slot’ (choana).
|
Performing a sinus flush. Here sterile saline is flushed into one nostril. The fluid washes through the sinus before dripping from the opposite nostril. This sample contains the bacteria in the sinus and is submitted for culture.
|
With some infections (like the Pseudomonas, mentioned earlier) the answer is an antibiotic course and identification and elimination of the likely source. For others (such as E. coli) that are always present in low numbers and only cause disease when the birds are ‘run down’, the answer may be antibiotics and a review of management practices. Some bacteria may be normal in one location but capable of causing disease in another site. Streptococcus is an example here. In the bowel, its presence may be regarded as normal but if it penetrates the bowel and spreads throughout the body it can cause severe disease. Your vet is the best person to interpret bacterial results and make recommendations to resolve the problem and get the pigeons back to health.
When valuable birds change hands, often a sale is concluded only
after a full veterinary examination. Here, a full set of samples including
blood for biochemistry, blood smears for haematology, samples for
PCR testing and a Chlamydia Immunocomb test have been collected
and are ready for laboratory submission. The bird has also been
micro-chipped.
|
Spending money on diagnostic tests often provides the most economical way of solving a problem. Frustratingly for veterinarians, many fanciers are keen to buy drugs but are reluctant to spend money on diagnostic tests. Others fail to understand the diagnostic process. I have had fanciers with an outbreak of disease in their loft kill and dispose of the affected birds and then ring me the next day to see what the problem could have been. Others confuse symptoms with a diagnosis. I have also had fanciers request a particular medication for their unwell birds because their friend’s birds, which had similar symptoms the year before, got better with that medication. These situations just don’t make sense. The technology available to your vet today for diagnostic testing is accurate and readily accessible. Accurate diagnosis means healthier birds, less use of medication and makes long-term economic sense.
Walking along the diagnostic pathway – backwards Some fanciers view the diagnostic process in reverse. When birds are not racing well, or there is disease in the loft, they start with a list of potential diseases and then aim to rule out each of these in turn by sending samples independently to labs or vets that offer this service or, alternatively, by doing ‘blind’ treatments This is usually not productive and is often the most expensive way of solving a problem (that is, doing specific tests for one problem at a time early in the diagnostic process). It also fails to reveal all aspects of the disease problem. |
A better strategy is to start with a set of symptoms, work with your vet to see which diagnostic tests are appropriate to investigate the problem and then, when the results are available, a diagnosis can be made. Most cases of ill-health do not involve a single disease such as coccidia or canker or Circo virus, but are the result of the interplay of a number of factors. Following the diagnostic process in a logical way reveals all aspects of the current problem and allows a more effective treatment and management plan to be developed.
With a health problem, don’t wonder what the cause could be but rather consider what test is likely to give the most information. For example, if the birds have diarrhoea, don’t just think coccidia and get a specific test for that, or treat ‘blind’. Rather, think what the appropriate initial test might be; for example, having the droppings analysed. Work with your vet to get real answers and a targeted treatment.
With a health problem, don’t wonder what the cause could be but rather consider what test is likely to give the most information. For example, if the birds have diarrhoea, don’t just think coccidia and get a specific test for that, or treat ‘blind’. Rather, think what the appropriate initial test might be; for example, having the droppings analysed. Work with your vet to get real answers and a targeted treatment.
When pigeons are unwell, don’t start with a list of possible diseases and work backwards to see if any of these are involved. Start with a set of symptoms, follow a logical diagnostic path and get a diagnosis when the results are available.